Photoshop Essential Tools - Retouching Tools
The largest group of tools useful to the photographer are the Retouching Tools. Even within this group there are a number of tools that can be ignored unless you discover a use for them. The two primary groups of tools are the Healing tools (J) and the single Clone Stamp tool (S).
Primary Tools - Healing


Primary tools include the Healing Brush and the Spot Healing Brush; sister brushes with similar characteristics. The difference is in the source choice for repair. The Spot Healing Brush chooses the source automatically and the Healing Brush requires you to provide a sample area. I prefer the regular healing brush as I prefer to choose the source area myself. Since the algorithm for the tool manages edge blending it is recommended that a hard brush is used by default. A newer blend mode option called "replace" allows the use of soft brushes and manages texture and image grain at the edges of a soft brush.
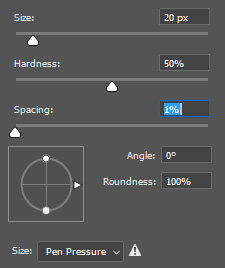
In the Healing Brush options bar you first have the option for the brush size, shape, angle, and spacing. The spacing is something I like to reduce to its lowest setting as that reduces the tendency to get scalloping on repairs when the brush is dragged. This is usually a bigger deal with the Clone Stamp tool. Next is the source panel which we visited at the beginning of the tools articles. The mode options include blend modes which will become more useful as you gain experience. In most cases the normal mode is sufficient. In addition to the sampled area there is an option to use a pattern which opens a dialog with pattern options. This is less useful for photographers. Aligned means the source will track with the movement of the mouse. Use legacy makes the brush operate like the 2014 version which is less sophisticated than the current version.
Sample allows you to make the source the current layer, current and below, or all layers. Current and below is a good option for retouching on a blank layer above the pixel layer used as a source. Sample all layers would include any adjustments you made above the layer in use. I generally avoid that as it can create confusing results that are handled by default if you keep your adjustments above your retouching which is the preferred method.
The diffusion setting controls how precise the operation is in blending the destination. Low values are good for detailed images and high values for smoother images. Sometimes the diffusion setting can result in unusual results, especially with the Patch Tool. Choosing another value often fixes this. The differences in values can be very subtle and usually working at the ends and the middle are sufficient to manage the results.
The Patch Tool allows you to select an area to be repaired and to then drag the mouse to an area to replace or that will replace it. You can choose to repair the source or the destination space. The process is similar to the healing brushes except for the use of a selection instead of a brush so it will work on larger areas and irregular selections. The patch tool does not work on a blank layer. They all attempt to impart the texture and tone of the source to the destination and blend the repair into the image.
The Content Aware Move Tool selects and moves the selection, filling in the source area with content similar to the surroundings. Structure settings control how strictly the blending is done with higher values being more strict. Color values similarly affect how closely the blending functions with higher numbers being more accurate. Sometimes this tool works surprisingly well, and sometimes the results are only a starting point to more careful retouching depending on the image. The Content Aware option is also available with the Patch Tool. The Red Eye Tool replaces the red from flash photography in a subject's eye with a more realistic black iris.
Primary Tools - Cloning
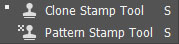
The Clone Stamp tool copies a selected area and paints it into the area you want to replace. In a similar manner to the healing brushes the source layer can be chosen, so cloning can be done on a blank layer. Other options include the blend mode and importantly, the opacity and flow percentages of the tool. The clone stamp is a brush and can be set for size and hardness and other options from the brush panel. Here is where the spacing option becomes important as straight lines cloned will tend to have a scalloping affect at the default spacing.

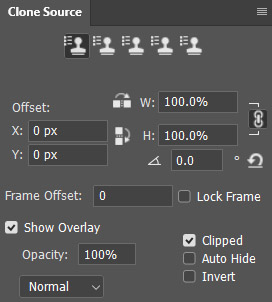
There is the Clone Source dialog which offers additional controls. Up to five separate sources can be chosen, but most people simply choose a source on the fly as they work. The source can be flipped both horizontally and/or vertically, and the angle of the result changed relative to the source. I suggest making sure the Show Overlay and Clipped options are checked. Clipped simply limits the overlay to the brush size and without it the entire image moves which can be more confusing than helpful. The clone source dialog settings also affect the healing brushes.
Any retouching should be done at 100% image size or higher. A problem with the clone and healing brushes occurs as you work near a hard edge. The solution is to choose a source which includes an edge similar to the desired result and then the brushes will act as expected. The only caveat with this is that edges may need to be rotated to get the desired effect.
Secondary Tools
My preference for the secondary tools is that you ignore them and find better ways to accomplish the tasks. The secondary tools are the Eraser, Background Eraser, and Magic Eraser (E) In addition to those tools there are the Blur, Sharpen, and Smudge tools which have no shortcut. The Dodge, Burn and Sponge tools (O) are also less valuable. In the cases of these tools there are other ways to perform the same tasks that are either non-destructive or more controllable. Most common for photographers are the Burn and Dodge tools which are better performed with adjustment layers and masks. I occasionally use the Eraser tool to remove pixels on blank retouching layers, but even that is rare and usually associated with restoration work.