Photoshop Essential Tools

Tool choices can be like preferences in that different users will find some tools more useful than others depending on how they like to work. There are a lot of tools to choose from and not all of them are essential for photography work. This article is simply a suggestion of what tools you may want to start with and as you gain experience you can add others. Many tools do similar things but in different ways, and there are always many different ways to do things in Photoshop. My toolbar is shown at the right as a double row. It is much shorter than the default toolbar in Photoshop. If you click on the double arrows at the top the bar can be made into a single row, which takes up less space.
Most tools have a small arrow at the right which will open a menu of the various optional tools within a particular shortcut key. There are a lot of tools available, and many you will never use. You can clean up and minimize the toolbar by selecting Toolbar under the Edit menu. The tools you "remove" do not disappear. They are available by clicking on the triple dot icon just above the color patches.
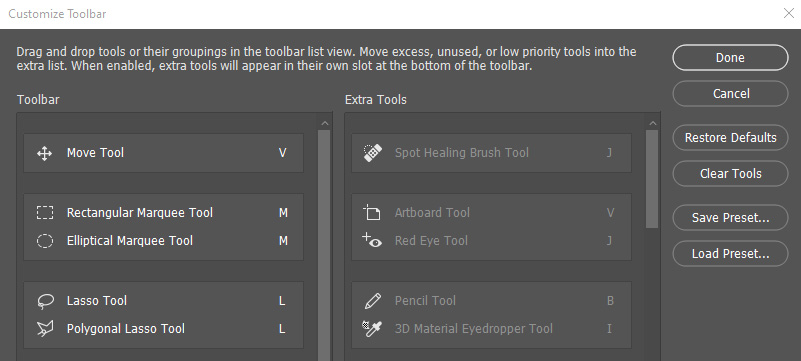
In the Customize Toolbar dialog you will see all of the tools available in sections divided by their shortcut key. When you start the Extra Tools section will be empty. As you discover tools that are not valuable in your workflow you simply drag them into the Extra Tools section and they will disappear from your toolbar. Minimizing the toolbar will make your workflow easier and finding tools faster. Not everyone will find the same set of tools useful and there are no rules. You take your pick. Restoring a tool is a simple matter of dragging it back into its section. Restoring the original default is a click of the mouse.

An interesting option is the Clear Tools button which moves all of the tools into the Extra Tools section. The only icons remaining will be the Move Tool, the foreground and background color swatches and the Screen Mode icon. A truly minimal tool bar. The Move Tool icon will then be replaced by the tool you choose using a shortcut key. This, of course, means you need to know the shortcuts. Not a good starting position.
Choosing tools using the shortcut key is easy enough and the last tool used will be what appears with the shortcut. Use the Shift key to move through the optional tools under the same shortcut. Using the shortcut key also gives you access to the Extra Tools which will appear in the section of the toolbar with the three dots icon just above the foreground/background color section. Clicking on those three dots also gives you access to the list of tools in the Extra Tools you have removed from the regular toolbar.

If you like using the shift key access to your tools you can eliminate the unwanted tools from showing up by checking the box at the bottom of the dialog. You can also show or hide the three dot icon, foreground/background patches, and the screen modes and quick mask icons. I suggest you leave them available with the possible exception of the screen modes.
Done simply enables your changes while Save Preset is how you save your modifications in order to have them available to reload. This means you can have multiple tool sets, or simply have a primary set you like for most purposes. Since you can restore the defaults at any time in order to see all the tools, the Load Preset option allows you to easily restore your saved favorite toolbar.