Smart Sharpen
In my estimation the most powerful sharpening tool in Photoshop is the Smart Sharpen filter. It must be applied to a pixel layer, so the best approach is to make a merged visible layer at the top of the layer stack and apply Smart Sharpen at the end of the process. Since sharpening applied to a file should be relative to the image size this will allow easy removal of the sharpening from a psd which can then be resized for output and resharpened. However, this is also one of the reasons why final global sharpening of most files is best done at the printing stage, preferably using the Lightroom print module.

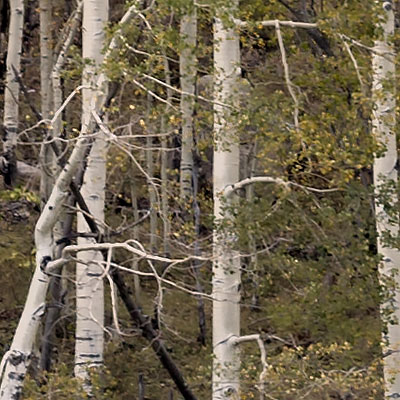
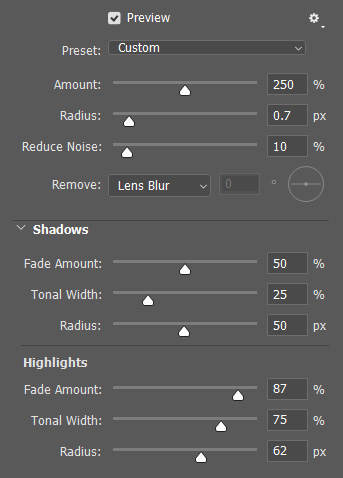
Roll over the image to the right to see the unsharpened version. Smart Sharpen was applied to this image at 250% at 0.7 pixels with no other parameters set. The effect is apparent pleasant sharpening with no visible halos or other destructive effects. The image is a portion of an image background and not intentionally sharp to begin with, so the ability of Smart Sharpen is shown here as pretty effective. That also speaks to sharpening effects being applied carefully to specific areas of an image rather than globally. Selective sharpening can also be used to help direct the eye to the desired focal point.
Smart Sharpen is actually a composite dialog that uses unsharp masking, noise reduction, and blendif capabilities in one dialog. This makes the application easy to use, and works exceptionally well. Absent the need for a different means of sharpening it is the best choice.
The first control is Amount, and in conjunction with Radius it works about the same as Unsharp Mask. It has edge detection as part of the process which makes it less likely to create halos, but still must be used carefully. You can start by lowering the Reduce Noise slider so you can see the full effect of the sharpening. Reduce noise should be used to reign in sharpening on smooth areas. If sharpening produces unwanted noise in skies and other areas reduce noise can be used to minimize that effect compared to the overall sharpening.
Increase the Amount slider until you see the sharpening effect you want, either in the image preview or the preview in the dialog box. Sharpening is best done at 100% image size on screen. If you have used unsharp mask sharpening before you will first notice that Smart Sharpen can be used at a higher amount without negative effects, but even more refinement is possible. As with all sharpening techniques a smaller radius is usually a better idea. Click the preview on and off to see the result and as soon as a noticeable change in the image is seen you have probably gone far enough. Increasing the Radius slider will eventually begin to show a crunchy effect, especially around fine details in otherwise soft areas, like eyelashes or fine tree details. High frequency images will show sharpening more quickly.

Next would be Noise Reduction. In an image with little noise the effect will be minimal, of course, but check for noise in the darkest areas of the image for the most effective use. Noise reduction always softens an image, so a compromise is usually needed between some noise and complete removal. Less obvious noise often simply disappears in the printing process, so the application becomes one of experience. If the image was captured at a low ISO or otherwise shows little noise, adding Noise Reduction would simply soften the image.
In the "Remove" box you have three choices as to how Photoshop applies sharpening. Gaussian Blur is the default and applies the sharpening to the entire image in a normal manner. Essentially a low pass filter, Gaussian Blur attenuates the high frequency elements of the image to sharpen without having too strong an effect on fine detail relative to the rest of the image. Lens blur attempts to sharpen the image in a manner similar to how a lens creates an out of focus image as the result of overlaying circles of confusion. The result is an inversion of the effect, and usually looks more photographically realistic than Gaussian Blur. Often the differences are very subtle. The third option is Motion Blur which can be helpful if the motion is slight and you can effectively match the direction of the movement.
The bottom half of the dialog is a simpler application of the Blendif controls. Amount is simply how much to reduce the effect of the sharpening. The tonal width is the percentage of the image tonal range to use to reduce the sharpening effect. I recommend starting with about 50% reduction on 25% on the tonal width of the shadows and higher numbers in the highlights. The radius setting in the shadow and highlight controls determine how far to look from any pixel to consider it to be within the range of the tonal width. The larger the radius to more subtle the transition between affected areas, so low radius values are not usually as valuable. These transitions can be very subtle in any case and difficult to see in many images. This is why a more or less standard set of values can be used as a starting point and only modified if those values do not work for a particular image.
Sharpening is essentially a contrast increase between pixels. Increasing the contrast where the pixels already have a greater difference, that being where we perceive edges, creates an illusion of sharpening. Therefore, over the tonal range of the image the contrast is increased, but more so where the contrast is already higher. At the ends of the tonal range, blacks and whites, that can kick the image into clipping if the values are high to begin with. Since increasing the white and black points is very easy, I tend to keep initial image contrast a bit low to avoid this problem, and check the threshold after sharpening an image. The attenuation of the highlight sharpening is important as bright spots will reveal themselves as adding a crunchy appearance to the image more quickly than in the shadows.
Using the concept that going too far and then backing off works best, sharpening can be applied at 100% on screen up to the point where the jump is visible. Then you can reduce the opacity of the sharpening layer to more reasonable levels. You can also mask the image to apply the sharpening to specific areas to improve control of the eye within the image. If the image is to be printed final sharpening should be done in Lightroom based on the image size.