Lightroom Overview - Part VI
The Detail Panel
The Detail Panel is where adjustments are made to sharpening and noise reduction. These are not intended to be ultimate or final sharpening unless you are exporting an image directly from Lightroom. The adjustments are primarily intended to overcome the lack of fine resolution in the original capture imposed by the demosaicing process. This process is what makes usable images from the light captured by the sensor array in your camera. It is inherently unsharp as edges are not discerned, only differences in contrast. Refining those differences allows us to make edges more distinct and therefore make the image appear sharper.
Some refinements to the image detail has likely been done in the Basic panel using Texture, Clarity and Dehaze. The Detail panel is where we fine tune the image sharpening, control noise, and attempt to make the best possible result from our capture. While there is a small area of the image shown in the Detail panel at 100%, the best results will be obtained by having as much of the full image visible on screen as possible. To do so click the 1:1 option in the Navigator to make the image 100% and click the arrow at the left edge of the screen to minimize the left panel.
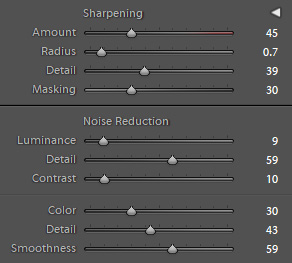
Choose an area of the image that is most important or has the most fine detail so you can easily see the effect of the sharpening. The amount slider only goes to 150. Radius defaults to 1.0 and only goes to 3 pixels. These are rather modest sharpening settings and indicative of the fact that you should be overcoming capture and not trying to do intensive image sharpening. The radius also only drops to 0.5 as below that there is no real discernible value. Settings should be gentle and as soon as a difference is seen on screen you have done the job. I find that amounts of 50 or less and radius values of 1 pixels or less are sufficient to make a noticeable positive change in the image. Hold the Alt/Option key and the amount slider window changes to B&W. This is because the sharpening is being done to the luminosity of the image and not the color channels. The Alt/Option key with the radius slider shows the edge detection in the same manner as the detail slider. It is easy to see there why lower radius settings are sufficient. The settings in the example to the right are purely arbitrary as defaults gray out and are harder to see in a capture of the dialog.
The Detail slider defaults to 25. Between zero and 25 the effect is minimal and works well for soft subjects like portraits where you do not want to emphasize details like pores in the skin. If you hold down the Alt/Option key you can see the screen go gray and as the numbers increase you can perceive slight edge halos. This is similar to high pass filtering in Photoshop and the sharpening is concentrated on the edges and protected from the smoother areas. At higher settings the detail enhancement can be useful in high frequency images bringing out fine edge detail quite nicely. Higher numbers in the Detail slider introduce "deconvolution" into the sharpening of the image. This is a complex algorithm that attempts to reconstruct the original image by removing distortion introduced by the filtering used in capture. You don't have to understand it, just use it. In images where softer detail is desired, such as portraiture, lower Detail settings are better.
The Masking slider starts at zero which is like a white mask on a Photoshop layer in that it reveals the sharpening to the entire image. The Alt/Option key trick here shows how masking is provided on the fly as the setting is raised. The darker areas being introduced are the smoother areas of the image. The remaining white areas as you approach 100% are the detected edges that are allowed to receive the sharpening effect. So, at low values the sharpening is more overall and at higher numbers the sharpening is increasingly restricted to the edges. On average scenes a middle value may be sufficient. The more you want to restrict the sharpening to edges the higher the setting should be.
Noise Reduction
The lower section of the dialog is where noise reduction is applied. Noise reduction is applied separately to Luminance and Color. Luminance noise is usually more apparent as high ISO settings are used or if the image is processed too strongly from underexposure. If noise reduction settings are too aggressive they can soften the image so care must be taken to not introduce unwanted blur into the image. Numbers under 20 are usually sufficient as we are still working on the basic capture issues. Stronger overall noise reduction may be approached in Photoshop if necessary. Topaz labs produces a plug-in called DeNoise which is very effective without introducing artifacts or overly smoothing the image. The Detail slider defaults to 50 and acts like a threshold control. Lower settings may produce too much softening and higher settings may not sufficiently reduce noise where it is confused with image information. The Contrast slider requires attention to small image details and can help overcome contrast reduction in low Detail slider settings. This is a subtle control in most cases and difficult to perceive.
With color noise reduction at 25 most color rainbow noise is reduced well. These are the speckles of color noise sometimes produced when the initial processing produces color artifacts. Higher numbers can be used if the Detail slider is increased to help detect edges. However, the fine details and color fringing not produced by other issues will be difficult to see at 100%. Avoiding over processing under exposed images will help avoid color noise issues to begin with. Color Smoothing can help to "diffuse" spots of color that may appear in shadow areas of an image but should be used minimally and if perceived necessary to overcome a mottled affect. These generally appear in larger shadow areas as darker than desired granularity in the image. This is rarely an issue with most images.