Lightroom Overview - Part I
This is an overview of Lightroom Classic and is not a detailed look at every aspect of the program. The idea here is to introduce you to the program and note some things you might want to know to get started.
Lightroom is a database management tool and a file processor. This means it can manage your images for you allowing more efficient filing and retrieval of images. It can also define the parameters to use to process raw or jpg files for export either into an editor like Photoshop or a final file for printing or sharing. By defining parameters I mean that Lightroom writes data to a file that tells the processor what to do to that file on export. It does not directly modify the file - it creates instructions on how to modify the file. That is the database part, along with remembering where files are located. All of that information is stored in the catalog.
Catalog Settings
Think of Lightroom as a library card catalog. The card catalog does not contain the books; it contains references to where the books can be found. Lightroom references where your files can be found on a hard drive. Therefore there are no images in Lightroom itself. The Lightroom catalog is information about your image files, the location of the file, resolution, color space, copyright, keywords, etc. As you process an image, more data is written to the catalog as instructions on how to process your image.
Under Catalog Settings in the General tab you are shown where Information will be stored and the "Show" button will reveal that location on your computer. The Backup section can be set to how you wish to manage backups. I suggest "Every TIme Lightroom Exits" is the safest option so you do not forget to save any changes you make. The File Handling tab allows you to manage the Preview Cache size and preview quality and how long to retain 1:1 previews. Discarding older previews frees cache space, and those previews are easily rebuilt. The size of Smart Previews is shown and may be zero if you do not use them. Standard previews are jpgs at monitor resolution. You can make 1:1 previews which are also jpgs, but at full resolution. Smart Previews are DNG files designed to allow you to process files when the original source file is not available. If you work on a laptop and store original files on a separate drive you may find this useful if you want to process files without the separate drive accessible. Otherwise there is no advantage to Smart Previews and they can be quite large.

In the Metadata tab under Editing you should check "Automatically write changes into XMP". This allows other programs to see changes made in Lightroom. Other options are optional, such as Address Lookup, Face Detection, and saving EXIF data. EXIF data changes will modify the original file and may not be a useful idea.
If you modify a raw file outside of Lightroom, such as in Adobe Camera Raw (ACR), the XMP file for that file will contain the changes, but Lightroom will not automatically update the database to reflect those changes. An icon will appear in LR (up arrow with lines at top right) indicating that the XMP file has changed. Click on the icon and you will be asked whether to import the modifications from the XMP file or not. Modifications made within Lightroom can be saved out to the XMP file so that changes will be recognized by ACR or otherwise travel with the original raw file. However, using Lightroom exclusively to modify your files will keep the process simple and avoid confusion.
Preferences
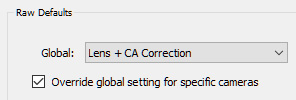
Most of the Preferences settings are just that, your preferences. In the drop down next to Global I suggest looking for Preset / Optics / and choosing Lens + CA Correction (Chromatic Aberration) as modifying these is a good idea to overcome capture faults. Checking the Override box means Lightroom defaults can be different for different camera bodies or settings. You can bake in modifications in the processing and have Lightroom automatically apply those differences. Managing changes in noise reduction for different ISO values would be useful.
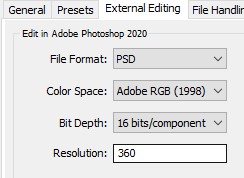
The external editing options determine how a file will be transferred to Photoshop for editing. I deliberately avoided using the word "exported" as that has a different meaning in Lightroom. If you export a file and open it in Photoshop you lose the file database management. You use the option in the Photo menu to "Edit in" and choose Photoshop. The file will open Photoshop and when you save the file it will automatically be added to Lightroom. The filename in Lightroom will have "-Edit" added to it and the extension will be psd. Your original raw file will remain in Lightroom. If you choose "Save As" in Photoshop you will simply get a new file and name in Lightroom. You can also import existing psd files to Lightroom for management and printing.
One possible confusing aspect of image editing in Photoshop is Color Space. Most photographers tend to work in sRGB unless they move into finer color control needed for printing. The Adobe RGB color space is a larger color space which handles a greater range of colors (color gamut) especially in greens and cyans. These can be important if you work with higher end inkjet printing or output to offset printers. Lightroom works in a color space similar to Prophoto in the Develop module in order to take advantage of the greatest possible range of colors. However, it uses Adobe RGB to display images in the other modules. Working in any color space is a choice you make, but exporting files for certain purposes requires matching the file to the purpose. Files for web are better in sRGB as it is web safe. Working in AdobeRGB is safe for most other purposes. Working in Prophoto in Photoshop is fine initially, but care must be taken when exporting files as shifts in colors and overall contrast can occur when Prophoto files are opened or printed. When working in Lightroom this should not be an issue as you can manage that aspect of the file in the export dialog. The biggest issue with Prophoto is the inability of your monitor to properly display the entire spectrum of color. This is why editing photos requires a monitor with a large color gamut. Most quality monitors will display 99% of Adobe RGB.
There are a total of nine tabs in the Lightroom Preferences dialog. You should look through them to familiarize yourself with options, but for the most part the default parameters are sufficient.
First Thing
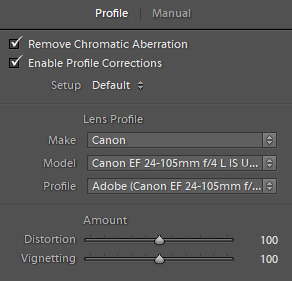
The first thing you should get out of the way is something that you want as a default in your image processing. That is to automatically apply two profile corrections to your files so you do not have to deal with that every time. Open an unprocessed raw file and navigate to the Lens Corrections tab in the Develop module. There are two tabs, Profile and Manual. Under the Profile tab you want to check both the "Remove Chromatic Aberration" and "Enable Profile Corrections" boxes. Lightroom will now automatically fix certain issues with your files, and yes, you want this done. Where it says Setup: Default use the drop down and find "Save New Lens Profile Defaults". If you are in an older version of Lightroom you may need to go to the Develop menu and Set Default Develop Settings and click the box to update to current settings. Under Preferences in the Presets tab the first section is the Raw Defaults.
The Interface
The Lightroom interface is basically three panels across the screen. As you move from module to module the three panels persist but the content of the panels changes to reflect the processes being managed in that module. The center panel is the image, or a grid of images in the Library, a comparison or survey view of images or the people finder.
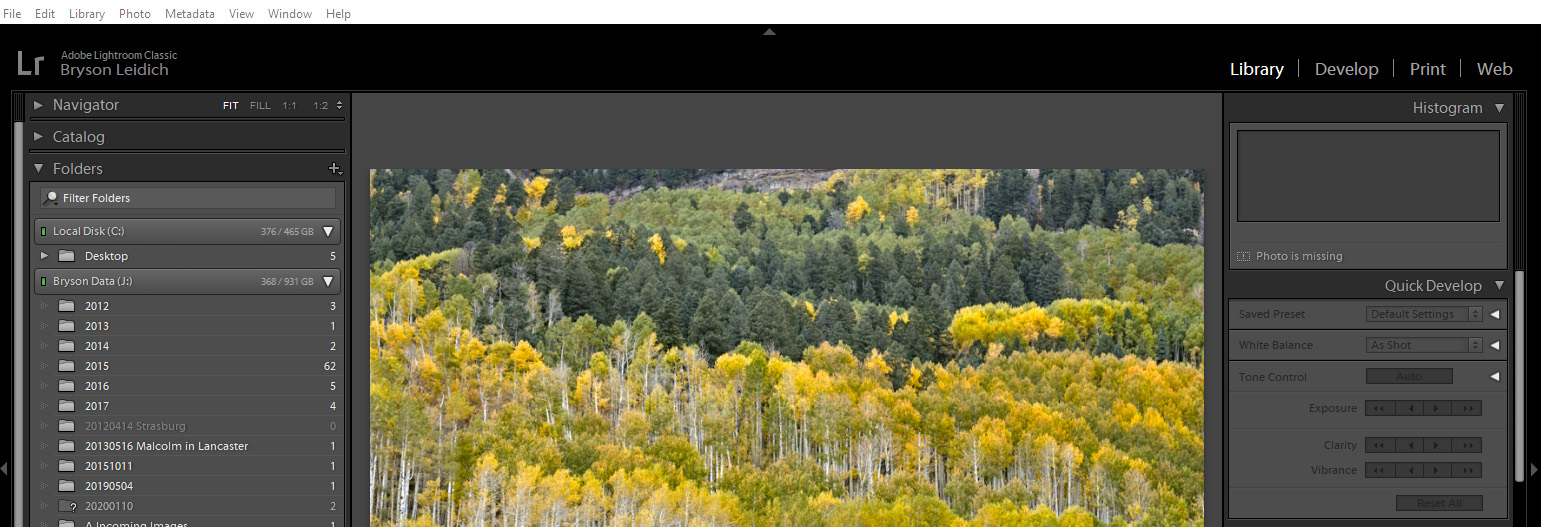
The left and right panels can be resized to allow more or less room for the center panel. The left and right panels can also be minimized by clicking on the arrows on the outside edges. This can be done to allow for more room for the image if a particular panel is not needed at the moment. When minimized they can be brought up temporarily simply by mousing over the edge above or below the arrow. On the right side at the top you choose the module you want to use. There are seven modules. Right click on an empty space in the top bar and you can choose which modules appear so you don't need to see things you do not use.
The Library Module allows you to import, sort, find, and view your files in several ways. There is a grid view for viewing multiple images, and a single image view. A Survey view allows comparison of two or more images, and a Compare view helps choose between two images for the better option. The People view detects faces in the images. If you tag faces with names LR will search for other photographs including those people and automatically tags those faces for you. The Library module includes a very basic adjustment tool, but image control is better done in the Develop module. Keywords can be added during import to add personal information or identification to the images for sorting purposes.
The Develop module is a powerful tool for application of adjustments to your files, including raw image captures. Modifications to your file are not applied to the original image file but are stored in the catalog as instructions on how to modify the file when it is exported to another program or to a final form. It shows you on the screen how these modification will affect your file, but your original file is kept in its original form. This is what Adobe refers to as non-destructive editing. In the case of raw files it is functionally identical to Adobe Camera Raw.
The Slideshow Module allows you to make an on screen presentation from selected files, or a collection of files.
The Map Module will read GPS data if it is included in your file and displays the point on a map where the image was made.
The Book Module allows you to design a layout of your images for printing from various book publishers.
The Print Module provides instructions for your printer so you can print your images. While this sounds rather simplistic, the Print module is one of Lightroom's most complex and valuable tools. Printing from Lightroom is the best means of getting high quality results from your images, provided you have access to a profiled printer capable of creating a high quality print.
The Web Module lets you compile your images into "galleries" which you can display on your website and share with others. It is a good way for professional photographers to send proofs to clients, or for anyone to share the equivalent of a slide show with others through the web.
Lightroom is therefore a "first step" in preparing files. Many consider it a substitute or replacement for the Adobe Bridge, which is a file viewer without the database management capabilities of Lightroom, and Adobe Camera Raw, which is a separate raw file processor. It is not, however, a total replacement for Photoshop or Elements which allow more precise, in-depth, local control over images. It is not a pixel editor. Lightroom has a specific tool for exporting images to Photoshop or other image processors you may choose for refinement of your images.
Catalogs

Most people only need one catalog. This is not an issue of the number of images, it is simply one of organization. If you want more than one catalog for separating images such as business vs personal images that is fine. There are no advantages or disadvantages to multiple catalogs.The catalog itself resides in the Pictures | Lightroom folder in the Backups folder. The actual location can be seen in the Catalog Settings dialog. You can mine here with a custom folder I created. The "show" button will open your explorer/finder to the location.
Backup catalogs are created each time you close Lightroom (optional). You should visit the Backup folder on occasion and delete older backups. I suggest keeping one or two copies for safety. Older backups are not deleted except by you manually. This should be done regularly. Catalogs are simply data, not images, so they do not take up a lot of space.