Layers and Masks
What are Layers and Layer Masks?
Layers are either pixel images or adjustments stacked on top of the background layer that appears when you open an image in Photoshop or Elements. Learning to use layers is a very important step in advancing through image editing as layers allow you to modify your image without damaging the initial state (non-destructive editing). Layers are not available to you in Lightroom, so advanced editing must be done in Photoshop or Elements. Layers allow you to modify an image or to permit such things as compositing images. They are valuable for detailed and specific editing of local areas of an image using adjustment layers, or overlaying colors or textures. Many global corrections are possible within ACR and Lightroom and some general local corrections can be done with tools like the adjustment brush, but very specific local corrections are better done in Photoshop using layers and their attendant masks.

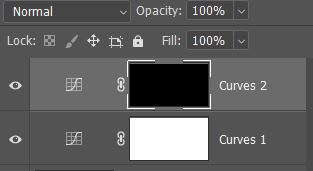
Masks are attachments to layers that can selectively restrict the application of the pixels in an image composite or the corrections in an adjustment layer. A composite image or adjustment is completely revealed in a white mask as though the mask were transparent. Levels of gray modulate the effect until black acts like a totally opaque overlay and hides everything. Masks appear automatically when you add an adjustment layer, but can be added manually to a layer to control the appearance of values or content within that layer.
Any shade of gray lighter than pure black will allow a percentage of the top layer to be seen or to affect the image below. Varying the value of the gray on a mask allows you to vary the intensity of the current layer in relation to the background or other layer below it. These modifications can be added to the mask using the Gradient Tool, or the Brush Tool or even by filling a portion of the mask from a selection. Modifications to the mask density can also be made using Levels or Curves.
Masks can be created from selections made from the image. With a selection active, adding an adjustment layer will automatically create a mask which allows the selected area to be adjusted and hide the adjustment from the remainder of the image. This can be used to make local color corrections to skin tones, for example, or to control the contrast of a local area such as a sky without allowing those adjustments to show on other parts of the image.

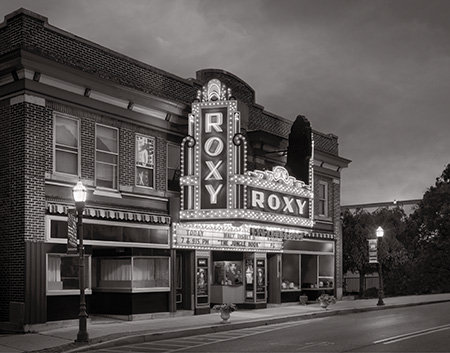
With a mask the black area will protect existing pixels and the white area will reveal the area you wish to change. The area can be modified with an adjustment layer or replaced completely with an overlayed image as is the case in the image of the theater.
Layers can be stacked on top of other layers and will affect all the layers below them or can be "clipped" to the immediate layer below to modify only that layer. With these controls you can modify various aspects of your image to get the desired affect. It doesn't take long to grasp the concept once you have tried it.
Without layers and their masks compositing images or making discrete modifications to an image would be very difficult, and impossible to remove without starting over from scratch. Since any layer can be removed without damaging the background layer below it, any mistakes or changes you want to make are easily redone or simply removed. This means that no so great decision you made last night can be dismissed in the morning light and a better one made in its place.
Pixel and Non-Pixel Layers
Pixel layers are layers which have actual content (pixels) rather than being adjustment layers. An adjustment layer such as Levels or Curves, for example, does not contain pixel information but is a modification of the layer(s) below it controlled by changes in the default for that layer which is typically no change at all. An adjustment layer contains an icon rather than an image at the left of the mask indicating what type of layer it is.
I typically keep pixel layers at the bottom of the stack as much as possible with adjustment layers added above. This prevents a pixel based layer, such as a merged visible layer, from rendering an adjustment layer ineffective. An adjustment under a pixel layer is effectively hidden by the layer content and no longer usable. This is not as difficult as you might think once you get used to the idea. Doing so allows you to make adjustments to the image and return to the bottom pixel layers to make changes in retouching. An exception is a merged visible layer at the top of the stack used for late stage sharpening. That makes it easy to remove the sharpening for modifications to the file, or to change the sharpening parameters as needed if the file size is changed for output.
Retouching Layers
Typical practice is to make a duplicate layer using Ctrl [Cmd] J immediately above the background layer to be used for retouching. This immediately doubles the file size as it doubles the pixels in the image. While this is not a really big problem in most cases, retouching can also be done on blank (transparent) layers which will reduce the added file size. Add a blank layer using the icon just to the left of the trash icon at the bottom of the Layers dialog or by using the keyboard shortcut Shift Ctrl [Cmd] N. The new layer will be added above the active layer so make sure you are on the background layer when you do this. When you use the keyboard shortcut a dialog will open allowing you to give the layer a name, mark it with a color and/or change the blending mode of the layer. Simply press the Enter key to dismiss the dialog is you have no need for the options.
Most retouching is done with the Clone Stamp tool or a Healing Brush Tool which will both open with the options bar showing a drop down for "Current Layer", "Current and Below", or "All Layers". Choose the appropriate one for your needs which typically is "Current and Below" to allow the tool to access the content of the background layer as the source material for the work you will do, assuming that the layer immediately below is the desired source layer. Choosing "All Layers" can give you unwanted results if an adjustment layer has been added above as the retouched content will reflect those changes as well. This is usually pretty obvious. I suggest retouching, being a pixel layer, be at the bottom of the stack just above the background layer or just above the layer it is intended to modify.
The singular issue with keeping retouch layers at the bottom of the stack is the possibility that a mask on a higher layer will keep an attempted retouch made later act in an unexpected manner. Putting the retouching higher risks the adjustment layers in a similar manner. If a decision to retouch after a number of adjustment layers with masks are applied you need to be sure that one of the masks isn't keeping your intended modification from working as you wish. The problem will be easily seen, but the solution will require toggling each layer on and off to see where the problem is. Usually a simple modification to the mask is an obvious and easy fix.
The third icon from the left at the bottom of the Layers pallet is a rectangle with a dot in the middle. This is the "Add Layer Mask" icon. A layer without a mask, such as a blank retouching layer or a composite layer will not by default have a mask attached to it and this is how you add one if you need it. Masks are added to pixel layers to allow compositing of information from one layer to another and hiding the content of the higher layer.
Composite Layers

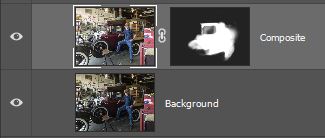
Copying another image into an existing image will position the new image above the active layer. Again, I suggest doing this at the bottom of the stack so that adjustment layers above intended for the composited image are not compromised. Since the new layer is a pixel layer its immediate affect is to hide the content of the layer below it. This is where the power of the layer mask comes into play with a pixel layer and what makes image compositing possible. We need a selection of the area we want to reveal and a layer mask to make that happen. That is often done by simply painting on the mask with a brush with white as the foreground color as seen in the image at the right.
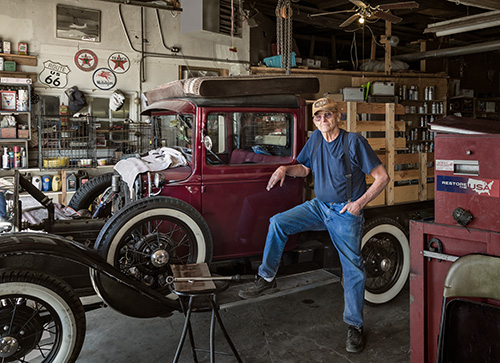
The finished image shown at the right is a composite of two exposures. The top layer was the overall shot of the scene properly exposed for the subject values. A second exposure was made for the higher values at the left edge of the image where the light was brighter entering the garage. This resulted in a darker overall image. The two images were aligned in Photoshop and a black mask added to the top layer to hide the image. The finished image includes the brighter exposure for the subject masked into the bottom image with the white areas painted onto the black mask. Other areas were either retouched out, lightened or darkened as needed to refine the final image. Since the subject was added at 100% opacity, the difference in his position in the darker image is not important as it does not appear in the finished image.

Selections in Photoshop are never perfect. Anti-aliasing of subject edges means selections are usually a pixel or two short of what we would prefer to have selected. This is not a masking tutorial so the details will not be resolved here, but Refine Edge or manual manipulation is the next step to molding the mask edges to perform in a more pleasing manner.
You can use selections in the same way to add adjustment layers to an image and make modifications to local areas. With an active selection choose your adjustment layer and the mask will be added along with the adjustment layer. Manipulation of the mask such as blurring will probably be needed and this is a skill that can take a while to master.
Adjusting the mask
Typically a layer mask made from a selection such as color range can be too specific. Mathematically derived selections can make one pixel black and an adjacent pixel white depending on their values. This will make the adjustment visually obvious when the intention is to blend it into the image. Refine Edge will appear in the Properties dialog whenever a mask is selected (active) or you can manipulate the mask manually with tools like the paint brush, blurring and even Levels.
Blurring the mask using Gaussian blue is one common means of softening the selection into a more usable mask. Blurring creates a gray transition area between the white and black pixels, emulating the anti-aliasing in the image and can be done with a low or high radius. Using Gaussian blur on the mask is better than "feathering" a selection as it gives you better feedback. Feathering can be a good means of controlling a selection that might be part of an action as it locks in a specific amount of control that can be repeated.
Another interesting way to modify and control a mask is using Levels. Since a mask is generally blacks and whites with a grayscale blending transition, running levels allows you to modify the mask and the way the adjustment blends into the image. This is a control that becomes way more obvious once you see it used, and is a powerful means of making masks meet your needs.
Vector Masks
Vector masks are not usually part of a photographer's tool chest, but can be useful if shape tools or the pen tool are used to create paths. The difference between a normal mask and a vector mask is rather simple. A normal mask is restricted to the square pixel grid known as a raster or bitmap, which you see if an area of an image is transparent. A vector mask can use a path that is independent of the pixel grid and therefore more accurate in describing curved shapes. Vectors are scalable as they simply define the path between two defined points. While this would seem to make a vector more useful, a rasterized image (converted to pixels) is more accurate in defining tonal variations and shading. Vectors are therefore useful in Illustrator for creating drawings or defining shapes. In Photoshop they can be used as a means to an end by defining shapes as paths which are then rasterized to become useful as normal layer masks incorporating anti-aliasing to show a curve or an angled line. If you have ever used the Type tool you will notice that type can be resized without getting jagged edges. That is because type is rendered as vector until you either rasterize the layer or flatten the file in which case it is rasterized automatically.
Viewing the Mask
You can see the mask instead of the image by holding down the Alt [Option] key and clicking on the mask itself. This will toggle the mask view and the image view so you can see what the mask looks like and also check for holes in the mask and otherwise make changes to the mask as you need. Masks almost always need to be modified to be blended into the image without making themselves obvious. Working with a mask is more than simply making a selection and in some ways is an art unto itself.
So, now you have an idea of why Layers and Masks are important. Start teaching yourself to work with them rather than trying to work on the original image so you can preserve the integrity of the capture and as a foundation for better image editing. There is no limit to the number of layers you can add to an image. Layers can also be grouped which can be useful if a series of layers provides a change and grouping them helps edify the intent. Layer groups can be modified in opacity which affects all the layers in the group.