High Pass Sharpening
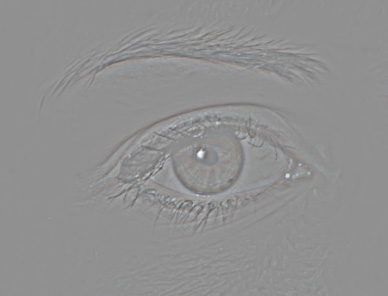
A sharpening feature not found in the Filters | Sharpen list is one of the easiest to use sharpening tools in the Photoshop family - the High Pass Filter. The reason it is not in the Sharpen list is that the High Pass filter by itself does not sharpen. It "passes" high frequency detail (edges) and filters out low frequency information (in this case skin) leaving a middle gray layer behind with the dark and light sides of edge detail in place. If you look at the histogram of a high pass filtered layer you will see a tall spike at the center. The dark and light halos created at the edges are what allows the blend mode to create the increased contrast which is what we see as sharpening.
The contrast increase we want is created by the contrast blend mode, usually Overlay, but often Soft Light can be used for a more subtle result. When a contrast blend mode is applied to a layer, middle gray tones are not affected, but values lighter and darker than 50% gray are exaggerated relative to their difference from middle gray. Since edge detail is the differentiation between lighter and darker tones, the result is the sharpening effect.
Here are the steps to create High Pass Filter sharpening
- 1- Create a new layer in the document. In a layered document make a merged visible layer at the top of the stack. (Ctrl)(Alt)(Shift)E - [Cmd][Option][Shift]E
- 2- Apply the filter - Filter | Other | High Pass
- 3- In the dialog that appears you need to decide how wide the radius should be for the sharpening effect you desire. Navigate on the image to bring an area with obvious edges into the preview box in the dialog to help you make the decision. The appearance on screen should be subtle. Often the radius will be less than 3 pixels, and occasionally less than one.
- 4- Click OK to dismiss the dialog and apply the filter.
- 5- Change the layer blend mode from normal to Overlay to see the effect on the image (the gray in the image will disappear).
- 6- Click the layer on and off to see the change. It should be subtle but noticeable on screen at 100%. Usually a brightening of highlights is the best clue.
- 7- If necessary, change the blend mode to Soft Light and/or lower the layer opacity to reduce the effect.
- 8- Add a black (hide-all) layer mask and paint with white to reveal the sharpening where desired.
The filter is best applied on a merged visible layer at the top of the layer stack saved as a psd. That makes it easy to remove and replace should the image need to be repurposed, resized, or otherwise manipulated. In a finished image it can be applied to a merged layer.
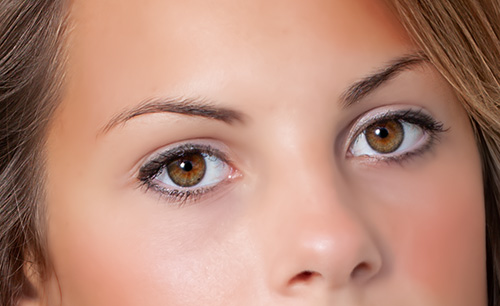
Roll over the portrait image to see the unsharpened image. Notice that the sharpening effect is subtle but helps the eyes and the hair detail. The sharpening can also be applied or eliminated to specific areas of an image with a layer mask. The effect can be controlled by choosing Overlay or Soft Light mode. On portraits, even though the high pass filter has no effect on smooth areas, fine detail like skin pores can still be affected so sharpening is usually painted into desired areas using a layer mask. That also allows you to selectively apply the sharpening to clothing and other parts of the image.
The primary decision for all sharpening is output destination and size. The sharpening for a small web image will be insufficient for a high resolution file aimed at producing a large inkjet print. Conversely, the print sharpening will be far too aggressive for the web image. Web images often benefit from High Pass sharpening as little as .3 to .5 pixels, where a file for a large print will require higher numbers, anywhere from 1 to 3 pixels. Higher numbers may be appropriate for larger files, but excessive application of the filter will produce somewhat "crunchy" results. This is difficult to control after the fact as the contrast is created by the blend mode. Using Soft Light will reduce the impact as will reducing the layer opacity. Very high numbers can create a special effect appearance, but that is not used for simple portrait sharpening.
The blend modes Hard Light, Vivid Light, and Linear Light will intensify the effect and you might want to play with them a bit to see the differences. Because of the way Pin Light works the effect on a High Pass filtered layer is very subtle to the point of not being of value. The remaining member of the contrast group, Hard Mix, creates a posterized appearance to the image, so as a sharpening tool it is of no value.
Since the High Pass technique essentially finds edges, smoother areas of the image are ignored which helps to make the process valuable without the need for masking. For example, High Pass sharpening of about 1 pixel on a portrait will sharpen the eyes and hair while ignoring the skin. For greater control, a layer mask can be applied to reduce or eliminate the sharpening from specific areas, or a black mask can be added and the sharpening painted in where desired.
Since it is easy to use, and often is applied in an action, it is a favored technique by many for portrait sharpening. However, since it would effectively choose the edges of tree limbs, but ignore the sky, it can be applied to landscape photography as well. Some brightening of certain areas may occur which will need a control such as BlendIf applied to the highlights to tame the effect. On high frequency images with small detail much higher radius values can be used to good effect. Larger details in the image may be an issue if they gain halos in the process. Sometimes blendif techniques can help.
Another interesting application is image softening. By inverting the layer the effect is reversed and the image is softened. This can also be valuable in portrait retouching. Details that should remain sharp (hair, eyes, lips) can easily be painted back in by applying black to a layer mask.