Exposure II
Exposure and Complications
Exploring exposure further we need to look at some technical aspects of the process. First is the basic concept of 18% reflectivity , which represents middle gray or a perceived brightness value halfway between white and black. Immediately we have a number of issues to deal with. Why wouldn't middle gray be 50%? The simplest explanation is that we are dealing the human perception of middle gray which is logarithmic rather than linear. This translates to the concept used for over a hundred years to make meters for assessing photographic exposure. This is more complex than it would seem, so the simple take away is best.
The issue is why 18% as opposed to another value? An average scene in daylight actually reflects about 12.5-13% of the incident light - the light illuminating the subject. This is one reason why camera meters tend to underexpose. But that makes no sense as the meter expects 18% and would naturally increase the exposure yielding a brighter image rather than a darker one. Since the camera makers know that the vast majority of shooters will use the camera meter without doing the math, they compensate for this difference and lower the exposure. The primary reasoning is to protect highlight exposures in jpg capture. Unfortunately, this leads to underexposure of our raw capture. Underexposure in raw means the loss of important detail in the highlights and the possibility of generating noise in the post processing of an underexposed image.

There are a few ways to overcome the inconsistencies. First you need to be sure the camera meter is seeing a reasonably accurate target area for making a decision. This usually means excluding radically different reflective areas such as bright skies. Then you compensate by increasing your exposure to adjust for the meter error. An easier method is to use an actual gray card rather than the average meter reading from the camera, but still remembering to factor in any errors in the way your camera reads exposure. This means some testing is required.
Testing Your Camera Meter
Fortunately, the test is simple and fast. Simply fill the viewfinder with the gray card or other relatively neutral target like white paper, focus at infinity, and make a proper exposure. The reason you can use something other than a gray card is that the meter will render the target as if it were 18% reflectance, so you have just proved it to yourself. A neutral target is the best idea as a target with strong color may not yield a simple spike in the histogram. This has to do with white balance and even auto white balance will not overcome a solid color. If your histogram readout is a wide band your target is not a good choice. If your histogram reads out RGB channels you will see them scattered rather than centered if the target is not rendered as gray, which means the white balance is incorrect. The sample histograms shown here are as they appear in Photoshop, but the same thing can be seen on the back of your camera at the time you are testing.

It is preferable to shoot in manual mode so adjustments can be more easily made. In the playback image you want to be able to see the histogram and confirm that the exposure is in the middle of the scale. Close is not good enough. Go for dead center as you are looking for what may be minor errors like 1/3 - 2/3 stop. If your camera is set to adjust in 1/2 stop increments I suggest changing that in your settings to 1/3 stops. ISO values are in 1/3 stop increments and it is easier to deal with things that are consistent.
Metering for Best Exposure
Once you know your meter is accurate you can move on to creating an exposure game plan. The idea is to expose the image as accurately as possible meaning capturing as much of the tonal range of the subject as you can without over-exposing the image. Taking advantage of the maximum dynamic range of the sensor means you cannot underexpose the image. If you do you lose highlight information to begin with and then you lose the relative shadow values which is the definition of dynamic range. Remember the concept of ETTR.
Using the camera's spot meter option read the highest important value in the scene while avoiding light sources and their reflections. Think in terms of detailed highlights. The meter reading will be for a middle gray exposure so we need to increase the exposure by two stops or more to get the brightness values where they should be. Provided the compensated exposure setting does not create highlight warnings or push the histogram to the far right wall with a spike, you are good to go. Check the values in the capture in the raw processor to see how they compare to what you expect based on your testing.
Another method, and the one that most professional photographers use, is the incident light meter. It reads the incident light rather than the reflected light values and gives you exposure values based on the anticipated 18% reflectance values. This is especially valuable when using something other than ambient light, such as electronic flash. However, the accuracy again depends on the accuracy of the meter. This is easily tested. If the exposure from either a gray card reading or an incident meter reading does not yield a histogram at the center when using the gray card as the target you need to dial in compensation or otherwise adjust the meter to overcome the discrepancy. With a corrected meter it is possible to expose most subjects accurately which is why pros tend to favor the incident approach. This was true with transparency films and is essentially true with digital capture. But, it still gives us a starting point rather than an absolute. How we wish to interpret the subject is another thing.
Any method you choose to determine exposure then becomes a starting point rather than an absolute and in conjunction with the histogram you can adjust the exposure to suit the subject or your interpretation. Subjects with a low contrast range that show gaps in the right side of the histogram are opportunities for a brighter interpretation in the capture. Initial raw processing can reign in the appearance and you are always better off in terms of noise and artifacts if you lower rather than raise values. The existence of more captured photons in higher exposures means available detail, especially in highlight values provided you are careful to not clip in any channel. This is easily managed even if you only use the highlight warning as a guide.
Reflectance Values
If the world was monochromatic exposure would be easier. Color tends to mess with the process in that our perception of brightness varies with color. We see yellows as brighter than blues, so a yellow that is the same reflectance value as a blue target would actually be seen as rather dull. Bright greens are also seen as brighter than reds, and significantly brighter than blues. This makes choosing a target value in a scene to represent a desired 18% value is nearly impossible. We can use some values other than a gray card as reasonably accurate. Caucasian skin varies as do most things but average skin is about one stop brighter than a gray card so compensation is fairly straight forward. Reading off of skin would give us a value one stop darker than we want as the meter would want to render the skin as 18%, so we open one stop to restore the reflectance value. Average grass is about one half stop brighter than a gray card.
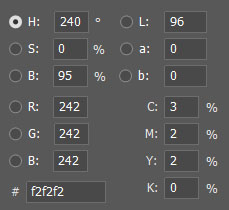
A reflectance value of zero would represent no return of light from the subject, or a non-illuminated area in a scene. Even charcoal and flat black paint reflect light. At the other end of the spectrum 100% reflectance is only possible with a mirror imaging the light source. Pure white snow reflects between 90-95% of incident light. The white target in an X-Rite ColorChecker is designed to represent 90% reflectance which would render in Photoshop as 95% in the H/S/B readout but 96% in L*a*b. To minimize confusion I suggest using the H/S/B brightness value as it more closely represents the value based on the color space you are working in.
Working from the end of the exposure scale, reading the brightest area in a scene ignoring specular values (light sources and their reflections) we can establish exposure by increasing our exposure to compensate for the meter wanting to render it at 18%. Typically we expect detailed high values to fall about two stops above middle gray so opening two stops to compensate for the meter will get us into the ballpark quite nicely. As I state in the first article, this is my preferred method of determining exposure based on reflectance values. The closer to actual gray the better which is why clouds in the sky are a natural target. In subjects with saturated colors, like flowers, a bit more thinking is required. Yellow flowers can be good targets as their high values will be fairly good representations. A dark blue or red flower will not be so accommodating. If you use the clouds be careful to choose areas without specular hot spots which may occur if the clouds are close to the sun. A little experience will go a long way with this method.
Reflectance values can also vary depending on the surface. A matte surface will reflect less light. A shiny surface will reflect more light. The transition from a highlight value to a diffused or true reflectance value and then to the shadow determines the subject contrast and the rendering of detail.