Blending Modes IV - Brighten the Image
Lighten Blend Modes
In any version of Photoshop or Elements you have access to layer modes with the default being Normal. If we make a color or density correction to an image, the default Normal mode of the layer means we influence both the luminosity and the color of the image. That is a default we can override. In this section we will describe the two members of the Lighten group of blend modes used most by photographers - Lighten and Screen.
Lighten Mode
The first mode on the list is Lighten which has the opposite effect of the Darken blend mode by selecting the lighter color of two layers. Darker pixels are replaced and lighter pixels remain the same. This allows discretion in the application of a composite layer or the modification of a layer by revealing only the information that is brighter than the base layer. In a composite where two layers with similar content are stacked together the Lighten blend mode will only reveal the information on the top layer that is lighter than that of the base or underlying layer. This is used quite a bit in compositing layers in light painting. Using the Lighten mode on an adjustment layer without changes will have no affect.
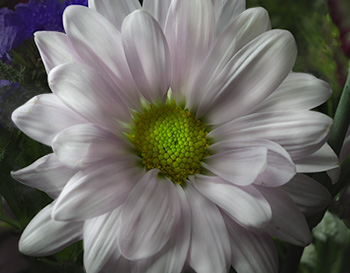
Roll the mouse over the image to the right to see the flower without the addition of a second image with a brighter center section. The lighter image was composited in Lighten mode and the desired result painted in on a black mask. However, the mask was not the determination of the tonal values, only the place where the change was allowed to occur. The brighter center section brightened in any place where the values in the second image were brighter than those in the underlying layer.
Another Lighten mode Linear Dodge (Add) affects the image in a manner similar to screen but with different math in comparing the two layers. The result can be a slightly stronger brightening effect and should be explored as an alternative option.

Screen mode
The second mode down on the list is the most common of the Lighten group of blend modes - Screen. The Screen mode lightens the image by multiplying the inverse of the blend and base colors. The result is always a lighter tone. Screening with black, however, does not change the image. Placing an image of the moon against a black sky over an image and putting the moon layer in Screen mode allows the moon to show against the layer below and the black sky simply disappears with no masking.
In the image at the right portions of the machine are too dark. Roll over with the mouse to see the result of a Levels layers in Screen mode applied selectively through a mask to target the machine. No changes were made to the Levels, only the blend mode was changed to Screen. The Levels layer was used at a lowered opacity as the full brightening of the image was more than what was needed for the effect. The Levels mask was black with the areas to be brightened painted white. Varying the gray levels of the brush allows the effect to be applied with discretion, usually by working with a brush at low opacity and a low flow to build up the effect and provide contouring as needed. This is a simple dodging technique and between the brush opacity on the mask and the overall layer opacity it is very controllable.
As is true of other blend modes, using an adjustment layer instead of a pixel based layer minimizes the file size. Of course, modifications can also be made to the adjustment layer, which can actually be any adjustment layer, and those modifications will also affect the result. Adding the blend mode to the affects of a hue and saturation adjustment layer would allow brightening of the image, and modifications to the hue, saturation and lightness of the revealed area as well.