Using Probes in Photoshop
Setting a Probe
Probes are used to monitor the values at a certain point in an image. You use the Color Sampler tool in the Eyedropper menu of the toolbar and click on the area you want to sample. The sampler will use the same parameters as the eyedropper, so before you set a sampler you should choose how much of an area in the image you need to sample. Point sample is not a good idea as it literally uses the single pixel under the cursor. You will likely want to choose either 3x3 or 5x5 average for most images, but higher sample areas are available for high resolution images depending on the image and what you are trying to do.
You can also set a sampler with the eyedropper as the active tool by adding the shift key. In the current version of Photoshop CC you can set up to 10 sample points. They are generally used to determine highlight or shadow values but can be used for any tonal value you want to determine a specific value for, such as a skin tone.
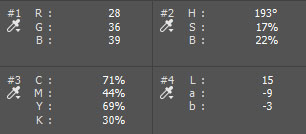
Once the sampler is set you will see the value reflected in the Info Panel. In the image at the right there are four samplers. Sampler #1 is set to read out in RGB values - #2 in HSB - #3 in CMYK - and #4 in L*a*b. You can choose the values that make sense for what you are doing by clicking on the eyedropper icon in the panel and choosing from the list. For most purposes the default RGB readout is appropriate. HSB and CMYK readouts are valuable in evaluating skin tone values. To remove samplers you can Shift Alt | Shift Option click on the sampler itself or in the menu you can click the Clear button to remove all samplers from the image.
Values can be modified using any Adjustment layer and the changes will be reflected in the readouts. Having desired target values is useful in manipulating the colors and tones in an image as the eye acclimates to the screen and relying on visual cues can be deceiving. The colors in the image can also influence your interpretation of the values at any given point in the image which is why target values are important.
Readout Options and Values
Both eyedropper and probe readouts are generally used in 8 bit mode which presents the values as 0-255. 16 and 32 bit readouts are also available but of little value to photographers.
RGB readouts are the most familiar with photographers and they represent the three primary color channels in an image: Red, Green, and Blue. The Actual Color option in the eyedropper options is the same as RGB. When the three are identical the tone under the cursor or the probe is neutral, meaning some shade of gray between black and white. Black (no color)is three zeros and white (pure or full color) is three readings of 255. Middle gray, for example, is 128 in all three channels. If the RGB numbers diverge with red higher than green and blue lower than green in equal measure the shift would be in color temperature toward a warmer value. If blue is higher than red and green in the mean, the shift would be toward a cooler value. Minor temperature shifts are not usually a problem and can often be used to impart a mood to the image.
When the green value shifts from the mean the color will take on a green or magenta variation from the neutral tone. When this tint shift is minor it can be hard to identify. This is why initial neutral or white balance adjustments to the original capture can be important. The white balance balances the green/magenta shift and renders the selected area neutral. If a departure from neutral is desired to a warmer or cooler rendering a shift in the temperature slider can be used, but the tint shift has been neutralized at that point.
Proof Color is not often used unless you are paying close attention to the color space of the intended output of the file. It represents the color based on the output color space. It will represent the colors that will appear in the file once converted from the working space to the output space. The visual aspect of the color may not shift if the color was within the output space to begin with, but if you are working in a large gamut space and converting for the web you may see shifts in both color and density as some colors are clipped in the conversion process. The visual aspects of the image are so much more important than the numbers in most cases that this is a rarely used option.
Grayscale reads the neutral density of the image. This can be useful in black and white conversions if two colors tend to present as the same tone. Shifting the colors in the original with an adjustment layer can show you the best means of separating the tonal values. A grayscale readout will show you how the densities change to brighter or darker based on color shifts. Most photographers tend to simply do this visually. Grayscale values present as low percentages in high values and higher percentages as the image gets darker. White is 0% and black is 100%
Web Color reads out the hexadecimal values of the color which would be represented in an image or graphic on the web.
HSB Color shows the hue, saturation, and brightness values. This can be useful in matching colors between images or modifying a color to an aim point. Skin tones are generally in the high teens to mid thirties in hue but can vary greatly. Low yellows in a portrait can present as a lowering of the hue value and help you determine needed color correction. Since this is independent of the brightness and saturation it can be useful. Also useful in looking for a color shift even if the saturation and brightness values do not match.
CMYK readouts are useful for skin color correction, especially in the AdobeRGB color space. The CMYK (Cyan, Magenta, Yellow, Black) color channels are used to describe subtractive color produced by inks in the offset printing process using four color plates and in inkjet printing. Adding ink or toner to white paper "subtracts" brightness values. This is the opposite of RGB where the colors are added to black to brighten the tonal value. The CMYK readouts are of little value to photographers except in skin color correction. Since CMYK values can vary greatly based on the output device, photographers should work in RGB and leave CMYK conversion to the person or device providing the output. In the case of inkjet printing, the printer driver converts the RGB values to the CMYK values and the toner output based on the profile provided.
L*a*b is a color model based on human vision and our perception of color. It is device independent. The L (Lightness) channel is essentially the image content and appears much like a black and white image. The a channel represents the green-red color components of the image, and the b channel represents the blue-yellow components. The L channel reads from 0 (black) to 100 (white) as a percentage of value. The a and b channels range from -128 to + 127. The Lab color values are actually the way Photoshop manages color in the background.