Photoshop Essential Tools - Crop Tools
Within a working document you can crop the image in many ways. With a Marquee (M) selected you can go to Image | Crop for example. A circular marquee will simply use the outer edges to create a rectangular crop. Any other selection tool will work in a similar manner. Most cropping is done with a member of the crop tool group which, for photographers, is the Crop tool and the Perspective Crop Tool. The Slice tools are used by designers to create assets such as links from sections of an image.
Crop Tool

The Crop Tool (C) has a number of options depending on your intentions. The basic concept is that you wish to remove some of the image to restrict what people see. You do so by simply dragging the crop tool over the image to set the top, bottom and sides to what you want to see. Activating the tool then removes the external information. One important aspect of this is in the option bar checkbox to delete cropped pixels. Doing so obviously removes the unwanted pixels and reduces the image size. With this unchecked the information in the file is retained and the crop decision can be revisited and original pixels restored.
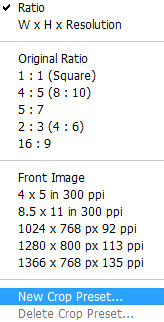
The first option in the bar is to set the desired crop area which can be free form or a specific ratio or dimension. In the ratio boxes you can add any numbers that represent a relationship between the width and height of the image. Notice there is no resolution box here. The dimensions will be relative and simply select pixels that match the numbers. The double arrow simply allows you to reverse the vertical and horizontal numbers. If you clear the boxes your crop is free form and can be any shape you like. You can select common relationships from the list below. The W x H x Resolution option allows you to specify the very specific dimensions and the resolution of the result. This will obviously resample your image and change the file size in the process. This should only be done if you know you need a specific image resolution. Some common options are at the bottom of the dialog. If you set any parameters you have the option of saving those as a New Crop Preset.
The Straighten option allows you to draw a line along any vertical or horizontal dimension you wish to set to correct an image with a tilt. The result will be a crop using as much of the image as possible. If the image simply needs to be straightened and doesn't have any other perspective issues this is a good option.
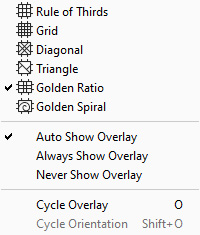
Next in the options is the choice of Overlays and how to show them. Crop overlays are suggestions as to how to consider image balance, but should be considered aids rather than rules. Several options are available. In the Preferences you have the option of Grid Color and the crop guides show up using that choice. This is only available if you use the classic mode of the tool. Unfortunately, you cannot enhance the line thickness so the color is your only option. You can also choose when the guides show. With the crop tool active clicking outside of the tool automatically imposes a grid over the image to allow you to adjust the rotation of the crop to align the cropped area with the image content.
The current versions of Photoshop use a newer crop guide with larger handles. The guide overlays are always white. You get two additional options here, one to center the crop are on the screen and another to show the cropped area which allows the entire image to remain visible. The newer version also enables the content-aware crop option which will attempt to fill blank areas should you extend the crop beyond the original content area. This needs to be done on something other than the background layer or a smart object.
Perspective Crop Tool

The Perspective Crop Tool allows you to correct unwanted perspective in an image where the camera was not either level or parallel to the subject. If you shoot a building with a level camera the sides of the building will be accurate. If you need to tilt the camera up to include part of the building the top of the building will recede slightly in the same way that a road or railway track recedes into the distance. If the building is shown in a strong perspective that perspective will look natural. If the tilt is minor the building will appear not in a natural perspective, but as if it were falling over. The effect of minor perspective is usually corrected, especially in architectural photography.
With the Show Grid option turned on you get an overlay that will help you line up the tool with the image content. I will often use the interior grid lines as a guide for the tool but you can also drag the edge to the structure to align it and then return the edge to the desired location. If you use the Front Image option to maintain the image dimensions and crop into the image the content may be stretched or distorted depending on the severity of the correction as your aspect ratios may not match. Clear the boxes to be safe. If you need to remove content in addition to straightening you can use the tool to fix the perspective issues and then return to the normal crop tool to remove unwanted pixels.