Photoshop - Workspaces
Cusomize the Photoshop interface to make it better suited to your purposes. This is called the "workspace" in Photoshop terms, and the program comes with several presets which you can explore. However, making it your own is not too difficult once you get the hang of it, and the result will be an improved workflow. The built in models are available under the Window | Workspace menu.
Workspaces
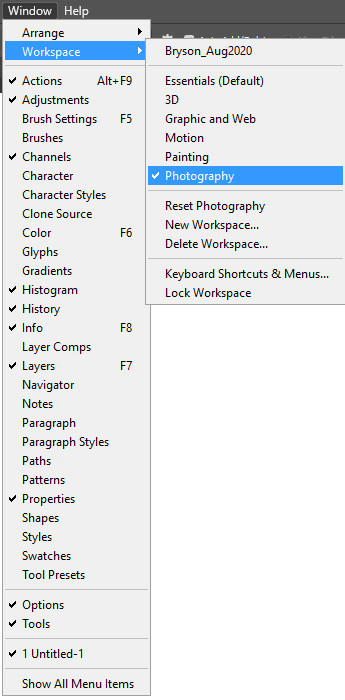
The "Photography" workspace is illustrated at the right as shown in the Window menu. The check marks next to the various window options indicate which windows will be open using this particular workspace. It is possible to turn off certain options which is addressed in Preferences, and the "Show All Menu Items" at the bottom is just there to allow you to see anything you might have turned off in order to simplify the interface. In this case all of the options are available. At the top you can see my personal workspace listed. I modify that as needed. When I click on that I see the windows I wish to have open, and they appear as I have then laid out on a second monitor. If you have only one monitor they will appear over your image. Control over the single monitor workspace is simply using the Tab key to make the windows disappear. The tool bar will remain unless you add the Shift key to the Tab key.
When you open any window it will show as part of a group. For example, you will want to be able to see your Layers, and if you check that on you will see Layers, Channels, and Paths appear as a group. You may leave that as is and navigate to Channels by clicking on the tab should you need then, or you can grab any panel by the tab and drag it out of the group onto the screen. Leaving groups intact is usually a good idea if you do not have the extra real estate of a second monitor as you want to preserve as much image space as possible on screen.
If you have no use for one of the tabs you can drag the useful tab onto the screen and then close the tab group using the "hamburger" menu icon at the top right of each group. The panel you separated will remain and the others will close. This allows you to minimize the clutter. Some groups will show only as icons which can be expanded when needed. These can also be seen in better detail by dragging the edge of the vertical bar to the left revealing the description of the icon, or clicking on the double arrow icon which expands the groups. Each panel will have a double arrow icon which allows you to minimize the panel to an icon to reveal more working space on screen. The double arrow on the Toolbar changes the appearance of the toolbar from a double to a single column of icons.
I suggest you first open the Layers, Info, Properties, and Adjustments panels onto the screen, or open the Photography workspace and modify it. Then drag the panels into the order you want them to appear top to bottom. As you move a panel under another until a blue line appears you will "attach" them to one another forming a new group. This is handy as the double arrow icon now allows you to reduce the entire group to an icon temporarily as you work on your image. These groups can also be moved around the screen if need be to make them less a bother depending on what you are doing to an image. Even more useful than reducing groups to icons is to make the workspace totally clean by using the Tab key to make everything disappear. Add the Shift key to keep the toolbar
Individual panel icons can be dragged onto other groups to rearrange them as you desire. One possible problem with this is making a group too large to fully appear on screen when expanded. If this happens simply drag the panels apart and create a smaller group. The locations of the panels is important when you want to create a named workspace you can return to. Once the screen looks good to you choose "New Workspace" from the menu. Note the options to include modifications you may make to Keyboard shortcuts, menus and the Toolbar as part of the workspace. This is truly how you customize Photoshop. Give the workspace a name and it will appear at the top of the menu the next time you open Photoshop.
While any window can be opened at any time, I suggest setting up at least a minimal workspace using the windows you use regularly. Those I consider essential include the Adjustments, History, Info, Layers, and Properties windows.
Screen Views
Another aspect of the workspace is not saved as part of your custom space. That is the ability to manipulate the primary screen view. Photoshop opens in Standard Screen Mode, which shows the open images as tabs, the options bar, the menu bar, and scroll bars. The title and scroll bars disappear with the Full Screen with Menu Bar option, which also allows you to move the image around the screen instead of being locked in the center. This is a better mode for editing, especially if you have a single monitor. The Full Screen Mode makes everything disappear except the image. In every mode you can customize the background color to either suit your preferences for working, or to suit the needs of a particular image mood. Screen views can be changed with the icon at the bottom of the toolbar, but more easily using the "F" key to toggle through the views.
Quick Mask
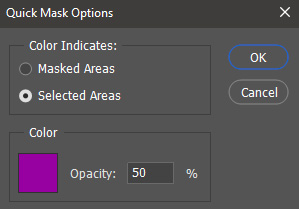
Quick Mask is an editing tool that places a mask over the image similar to what a graphics person would have done with a rubylith film. This is to determine what is hidden or revealed. In the case of the rubylith what was covered was hidden (masked), and that is the default setting. Most photographers prefer to see what is selected as that is easier to work with when modifying selections using the Quick Mask option (Q). Change the option to Selected Areas. The Opacity of the overlay and the color can be changed at any time depending on your needs when editing an image. The Quick mask can also be engaged with the icon immediately under the foreground/background color swatches on the toolbar. Double clicking this icon opens the options menu you see here.