Pixels, Image Capture and Resolution
One of the most basic aspects of understanding digital photography is understanding the concept of pixels and resolution. In the past we did not have to understand the science behind how film captured images, but with digital photography we are dealing with details of the process over which we have more control. So, it is important if you are doing any more than casual personal photography to understand exactly what you are dealing with in a digital camera. First we will deal with some pixel basics and then some definitions relevant to working with digital files.
Pixels - Digital Building Blocks
Digital Photography is a binary system, which means it is based on two possible states of an electronic signal, on or off. Off is 0 (zero) black, and on is 1 (one) white. This is called a one-bit image. Obviously limiting, there is no color or shades of gray possible in a one-bit image. But, if we combine 8 bits of information and use the result to define the state of the single pixel, we can expand the possible states of the image from two (black or white) to 256, creating a stepped scale from black to white, or a grayscale image.
A grayscale image is a single channel image with 8 bits of information ranging from 0 to 255, a total of 256 different states or levels of brightness in this case. If we expand this system to 3 channels, each containing 8 bits of information, and let one channel define red values, one green values, and one blue values, we create a 24 bit color image (3 channels times 8 bits per channel), also called "true color". In programs like Photoshop this is referred to as an 8 bit per channel RGB image. The combination of the three channels provides 16,777,216 total color variations, slightly beyond what the human eye can actually perceive in terms of color variations. RGB images represent values of luminance or brightness. Higher numbers are equivalent to more brightness. The combination of values create the hue, saturation, and brightness of an image.
A more complex representation of values is the 16 bit image. This is also referred to as 48 bit color with consideration to the three channels. Raw images opened in Lightroom or Adobe Camera Raw are represented in 16 bit color to allow for maximum flexibility in editing without creating unwanted banding, which is a breaking of smooth transitions between colors. When these files are exported to Photoshop for editing they can be converted to 8 bit images, or maintained as 16 bit images. As output file, jpgs are automatically flattened and converted to 8 bit as part of the process. If you export a tif file you need to be careful as tif files can be layered and saved in 16 bit which may not be useful to someone you share the file with. The advantage of a 16 bit file is simply information which is less likely to show unwanted banding and noise in the process of remapping colors and/or densities.
CMYK images use 4 channels instead of 3, Cyan, Magenta, Yellow, and Black, and they represent the colors of inks used to create images in a printing press. Inkjet color printers basically print in CMYK using inks or dyes. However, images sent to an inkjet printer should remain in RGB as the printer's software handles the conversion. In fact, CMYK images sent to most inkjet printers will be converted to RGB by the print driver before printing. Output for offset printers should also be maintained in RGB as conversions to CMYK for separations requires attention to the printing profile of the output device and is best done by the print house using their software. In other words, photographers rarely have to deal with CMYK files unless they need or want to use channel information for specific purposes.
Digital Capture

The vast majority of digital cameras use a Bayer array created in 1976 at Eastman Kodak. This uses a 4 pixel array with red, two green, and a blue sensor. The sensors are actually the same but they are covered with filters to create the colors. The two greens help to emulate the way we see light as the broad spectrum of color is the center of the spectrum, the red and blue being the ends. The individual sensors capture the light and then a process called demosaicing interprets the signals received and determines the color that most likely should appear at that particular pixel. Obviously the interpretations can be less than perfect, which is often seen in tree limbs against the sky as an unwanted color shift. The fact that we get the quality that we get from our cameras is pretty amazing, which is testament to the people who write the software for the cameras.
Regardless of the output you choose to use, a jpg or a raw file, the initial capture is a linear response to the photons captured at each pixel. This tends to strongly favor the highlights. In fact, half of the exposure information is in the brightest one stop of the exposure, each subsequent stop lower in value being half of what remains. This would not only look bad to us, but would be rather useless in image making. Software again to the rescue as "gamma encoding" renders the tonal scale as something we can understand visually. This is tone mapping on the basic level and produces the camera processed jpg file. From the raw data we can use Lightroom, Camera Raw or other software to do our own tone mapping and create the image we want.
DPI - dots per inch.
This is a term used to define output, such as offset printing, and even inkjet printers in that the production of a printed piece is done by putting down "dots" of ink onto paper. It has been used as interchangeable with pixels per inch (ppi) which is somewhat confusing. The difference is minor, but the proper use would clarify your meaning and understanding. Digital files should always be referred to in terms of pixels per inch as that is precisely what they are. Dots per inch only refers to output; ink on a printed page. The final resolution in dpi will depend on the output method or device.
PPI- pixels per inch
Pixels per inch (PPI) define the number of pixels in every inch of either a digital file or a monitor display. Digital images are simply pixel arrays of a certain set of dimensions defined as width and height. While generally considered an output device, a monitor is defined in ppi as the device uses pixels to display the image. Images can be described simply as their width and height in pixels. An image with 400 x 600 pixels is simply that and will not change unless cropped. The output of that image will change in size depending on the resolution number assigned to it to describe how to produce a print. On a screen at 100 ppi the file will render 4 x 6 inches. On a print at 300 "dpi" the image will only print 1.33 x 2 inches. Divide the resolution number assigned into the pixel count. You need to be aware of how and where the file will be seen in order to provide the correct pixel count.
Resolution
Resolution is the number of pixels or dots per unit of measure (usually inches) relative to an output device. This number can change depending on the device, but changing the resolution does not change the size of the original image array. The size of an image array will remain the same, but the size of the output will change relative to the assigned resolution. For example, a 3600 pixel wide image will print 10 inches wide on an Epson printer if the output resolution of the file is set to 360 ppi (3600/360=10). On a Canon printer or other device using 300 ppi the same image will print 12 inches wide as it will take more physical space to use all 3600 pixels at the lower 300 ppi resolution (3600/300=12). It is a matter of simple math, pixels divided by resolution. At the same time the same image will display 36 inches wide at 100% on a monitor with a 100 ppi resolution. That's why you can't see the whole image at full size. This is an important concept to understand as it affects how you manipulate files for display or printing. It is more important to know how many pixels you need.
RESIZE or RESAMPLE
To resize is to deliberately modify the size of the pixel array, usually by decreasing the number of pixels in the array. Without resampling this will simply change the effective resolution. Resample means modifying the size without modifying the resolution or modifying the resolution which will affect the size. Note the links on the width, height and resolution in the samples below.

In this image size box in Photoshop the Resample box is not checked. Note the chain symbol indicating that the width, height and resolution are locked together. This means that a change to any one will automatically mean a change in the others to maintain the relationship. A change in resolution will mean a change in size, or a change in one size will mean a change in the other. The relationship must be maintained. Our image is 6 x 4 inches and it set at 300 ppi. The image size is 12.4 Mb and the pixel dimensions are 1800 x 1200.
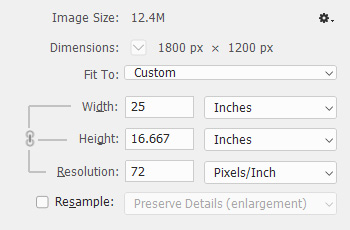
In the image size box the Resample box remains unchecked so the parameters are still locked together. With the resolution changed from 300 to 72 ppi the pixel dimensions (1800 x 1200) and the file size (12.4 Mb) are the same but the image size in inches has changed to reflect the change in resolution. No change in the file size or pixel dimension means that no interpolation of the file has been made. Only a change in the characterization of the file relative to its resolution has been made. So, the size of the output is now 25 x 16.667 inches because fewer pixels are used per inch of output. To use all the pixels the size of the print must be larger.
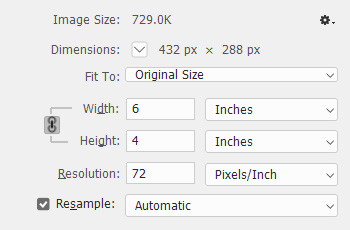
In the image size box the Resample box has now been checked. The resolution is no longer locked to the width and height, so the change in Resolution has not changed the width and height in inches. The file size has been reduced considerably and the dimensions of the file have been reduced to 432 x 288. Therefore the file size is smaller at 729 Kb. The width and height remain the same in inches but the resolution is lower. This means that the image size will be the same in inches on a 72 ppi output device as the larger file would be on a 300 ppi output device. The file has been interpolated and the pixel array has been changed. The file size is obviously reduced. The important fact here is that resampling the image changes the pixel array.
It's all about the pixels
The determining factor in a file is always the pixel dimension, and the resulting output in inches depends on the resolution of the output device. The higher the output resolution the smaller the result given the same number of pixels. This is why images on screen are larger than in print. The output of the screen is a lower resolution than a printer. Printing at a lower resolution would result in a larger print.. This is fine if image quality is not sacrificed as a result.
Screen resolution is set in your display settings and is approximately 100 ppi for desktop monitors, but that can be different if your monitor settings are not the full resolution recommended. Tablet resolutions can vary greatly and current tablets can have very high resolution numbers. Printer resolutions are set in the driver at the time of printing and vary according to the needs of the print output. Typically Canon printers use 300 ppi and Epson printers 360 ppi for high quality images. Lower resolutions are be used for creating larger prints and viewing distance is usually a determining factor in deciding how low the resolution can be and still be considered high quality. Epson prints at 270 ppi and Canon prints at 150 ppi can look quite good at the proper viewing distances. It is often said that the viewing distance for photographers is limited only by the length of their nose.
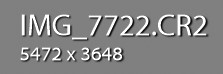
Our digital cameras capture pixel arrays with much larger numbers. The size of the capture in pixels does not have a specific resolution until we assign one. If you open a file in Lightroom or ACR (Adobe Camera Raw) you will notice that the file information does not have a resolution number, only the size of the pixel array in height and width. This is what we need to understand about image sizes, that they are arrays of pixels with a width and height and only have a specific size when assigned a resolution. So, the resolution of a file is not set until the file is exported to Photoshop as set in the External Editing tab of the LR Preferences or Workflow Options in Adobe Camera Raw.
Printers can output to paper at a variety of resolutions depending on the paper being printed on and the desired fineness of the finished image. However, the resolution of the print head does not enter into the decision of the image resolution needed by the printer driver to make the print. A printer may print at 1440 dpi or 1200 dpi, but the file sent to that printer would be properly 360 ppi or 300 ppi accordingly. The rest is managed by the printer driver and is part of the settings in the Lightroom print module. It is not necessary for you to deal with those details unless you are the one operating the printer. When creating a file you would not set the file resolution to match the print head resolution. That is handled by the printer driver.
CROPPING

Cropping is the removal of unwanted pixels from an image. This should be done without imposing a resolution unless that is specifically required. This means clearing the resolution box in the crop tool in Photoshop so that interpolation is not imposed. There is a Clear button next to the resolution box for this purpose. Further to the right in the dialog is a check box to Delete Cropped Pixels. I suggest leaving that unchecked. That will allow you to return to the crop later without being restricted to your first inclinations. It is possible to crop without regard to an aspect ratio, which is what I typically do with a file. With the Ratio selected but empty dimension boxes the crop tool is free to move in any manner you desire and the shape of your image will be limited only by your vision of what should be shown.
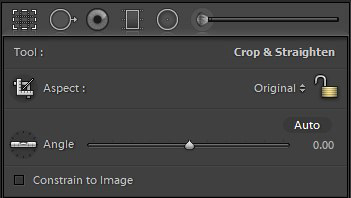
Cropping in Lightroom can be done with the aspect lock engaged or open. When open freeform cropping is available. When engaged a dropdown list of ratio options is offered along with the opportunity to create a custom aspect ratio. There is no resolution option even offered. This is to avoid resampling of the image, which should be done in the Image Sizing options in the Export dialog. The Angle tool permits a horizontal or vertical line to be used to establish leveling/straightening the image. There is also an Auto option which will cause Lightroom to make a best guess for the orientation of the image based on the image content. The Constrain to Image option simply keeps you from setting cropping options that exceed the width or height of the original image dimensions if desired.
You may want to fit an image into a 4x5 (8x10/16x20) aspect ratio. Only if the intended recipient of the file or the output device being used demands imposing a resolution would I impose one. Since the image size can be set at the time of the printing, the actual image resolution is not relevant up to that point. By imposing a resolution you simply define the image size at that resolution. Imposing a resolution is primarily informational in most instances. In printing, Lightroom will interpolate the file for you, so resizing to a specific size before printing is not only not necessary, but may result in a loss of image quality. Let Lightroom do the work, that is what is was designed to do.
Lightroom and other software used by printers can do the interpolation of the file for printing better than Photoshop can. Typically a print house will use what is called a rasterized image processor (RIP) to make your image fit to the size you require and the resolution needed by the output device at the same time. Professional photographers outputting files to offset print houses typically impose a resolution of 300 ppi to a file. That is a convention rather than a necessity in the same manner as 72 ppi is conventionally used to describe a file for the web. Since your monitor or tablet is not 72 ppi the web is obviously not 72 ppi either. Doing so only allows you to see the approximate image size in inches as most people are not used to dealing with image dimensions solely in pixels. Clients requesting "high res" images usually expect the image to be designated as 300 ppi. This is also a matter of convenience and satisfies the client's expectations. A file with the appropriate pixel dimensions would always work fine as the resolution can be changed without changing the file size as seen in the original file size illustrations at the top of this article.
Printing
When sending files for printing to me or other output services it is not necessary to resize the image. I am repeating myself, but for good reason. Once the image has been cropped without imposing a resolution the information in the file is at its best. Resizing the image may actually may reduce the image quality. At that point just leave the image alone and request the final size you desire, usually by describing the longer dimension in inches. For example, you may want an image printed to 17 inches wide. The height will be determined by the aspect ratio as cropped. Only if the height exceeded the paper size desired would a problem occur. Another option is to simply request the largest image size possible on a specific paper size. I use Lightroom to print images as it will do the best possible job of making your print the size you request.
Once you get this concept in your head the issues of image resolution should disappear and you only need pay attention to it when exporting an image for a specific purpose. In that regard you need to read the specifications from the recipient to see what is requested.