Lightroom Overview - Part III
Develop Module Tools
Under the histogram is the tool bar with the Crop tool, Spot Removal tool, Red eye Correction tool, Graduated Filter, Radial filter, and the Adjustment brush. These can be all be used to modify the output file using the Export Dialog. I recommend not using any of them if your primary intention is to further process in Photoshop as the tools there are more extensive and powerful.
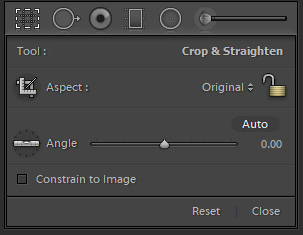
The Crop tool lets you establish the image crop and by default is locked into the aspect ratio of the original capture. Clicking on the drop down lets you choose different aspect ratios including a custom ratio. Clicking on the lock icon unlocks the adherence to an aspect ratio allowing for free form cropping without regard to an established aspect ratio. The Crop tool includes the Straighten tool which can be used to set a horizontal or vertical alignment. There is also a free form rotation bar. Setting an alignment will crop the image within the bounds of the image. The Constrain to Image checkbox forces any crop to live within the bounds of the original.
The Spot Removal tool operates in either Clone or Heal mode. Clone mode will copy an area of the image into the area you select. This is an automatic selection which you can modifyby dragging the source to another area of the image. Similarly the Heal mode automatically chooses an area to use to heal and you can modify the selection. The Brush size, Feather (blurring), and Opacity sliders allow you to control the results.
The Red Eye tool has two selections, Red eye for the effect of a flash on people's eyes, and Pet eye which does the same thing except that pet's eyes are often a color other than red.
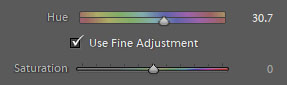
The latest update to Lightroom Classic includes a Hue adjustment slider which allows you to modify the color in an image with any selection made with the Graduated and Radial filters and the Adjustment brush. With an area selected you can slide through the hue strip to modify the color of that area. Saturation is also controllable. If you are not editing in Photoshop this greatly simplifies local color modifications.
The Graduated Filter is a much more complex tool which allows you to introduce a variety of modifications to the image which are applied in diminishing intensities from a starting point to an end point. Modifications can be made after the area is chosen and can be used to introduce vignettes, and other modifications to exposure, density, contrast, color and other values in the image. The default "New" changes to "Edit" to allow you to make changes and the Brush option allows you to modify the Graduation to modify a specific area. Controls available to the filter include all of the modifications to the image that are available in the Basic tab of the develop module and the sharpening and noise reduction options in the Detail tab. There is also a Moire control for reducing interference patterns that sometimes occur with textures that interact with the capture array in the camera.
The Radial Filter is similar to the Graduated Filter but creates a circular or ellipsoidal correction area on the fly. Modifications are also similar to the Graduated Filter but there is no Brush option. The Radial filter also has a feathering option to adjust how it blends into the area of correction.
The Adjustment Brush is the third tool of its kind and allows the same modifications as the Graduated Filter and the Radial Filter, but in a more free form manner. The O key allows you see a mask overlay of the affected area and