Exposure
Exposure is the relationship between the various tonal values in the image. Proper exposure captures the relative brightness values so that minimal post processing is needed to reflect the original scene. The differences in reflectivity of areas of the scene is what creates the image and sets the mood of the photo. The average image will have differences within the capture capability of the camera, referred to as the dynamic range. If the differences are great the image is said to have a high contrast and may require special consideration such as exposure bracketing, HDR or exposure blending to reign in the contrast. A subject with less inherent contrast will have a flat appearance coming out of the camera and may require expansion of the differences in tonal levels to look like you want it to.
Most photographers do not deal with exposure in a precise way. The camera’s built-in meter and auto exposure serve the purpose in many cases and leave the photographer free to react to the scene. This is a positive thing as you need to react to the scene rather than fuss with the camera. Unfortunately, it can lead to less than optimal exposures. A little fussing up front can lead to better captures and less post processing angst. This is especially true when you do not have to react quickly to a changing scene which is typical when shooting landscapes. Camera meters tend to under expose in order to avoid over exposing highlights. In the case of jpg capture this can be an advantage as "fixing" blown highlights is not easy if possible. In the case of raw files it causes a loss of important detail in the high values and can eliminate as much as 50% of the information you should have in the file. This is due to the linear capture of a raw file and the fact that half of the information captured is in the first or highest stop of information (highlights).
Exposure Relativity
This image has a high overall range of contrast, but low local contrast in areas outside of the subject. It falls well within the dynamic range of the camera and required little fussing to get the idea across. The dark areas create a frame for the subject. If the image were exposed according to the camera's meter in a normal mode the tendency would be for slight over-exposure due to the large areas of dark value. Camera meters only see tones, not subjects, and they want to resolve the average of the tones they see as 18% gray. In this image a more localized meter reading of the subject or a spot metering of the subject would give more accurate results. The problem is that no matter what you point the meter at, the camera wants to make it middle gray. So, if you point it at the shirt you get a gray shirt and a seriously under-exposed image. Pointed at the skin the image would be closer to correct but still a bit under as skin is typically higher in reflectivity than an 18% gray card. This is why exposure can be somewhat complex and mastering it requires some attention to detail.
The typical exposure technique used by most photographers is an average or center weighted camera meter reading. Camera manufacturers design their metering systems to work fairly well in this manner and the average scene in average light will be exposed well enough to satisfy most shooters. I find my camera meter tends to underexpose by an average of 2/3 of a stop depending on the subject matter reflectivity. The solution is a fairly simple one and the tool for it is in the camera; the histogram.
The Histogram

The histogram is a physical representation of 256 brightness values in the image based on a camera processed jpg. Typically, raw files have greater tolerances for slightly brighter exposure levels than a jpg file. But a well exposed image should look fairly typical on the camera histogram. In the camera picture style menu you can lower the contrast and sharpening settings which will provide you with a better representation of the raw file, which you cannot see. Higher contrast and sharpening settings in the camera produce histograms that are greater in range than the raw file will be and may trigger clipping warnings in the highlights when none are really present.
The image to the right is of three bracketed exposures of the same file. The top histogram is underexposed with the black values hitting the left wall. Center is a typical average exposure histogram will full values. The bottom is overexposed with the white values climbing the right wall. In an image with a lower contrast range than the camera's dynamic range the histogram may not fill the full area. If the tones are predominately dark the values will show more to the left, and if mostly bright will show more to the right. Since a raw file is essentially linear the preference for capture is to favor exposing to the right (ETTR) which favors placing the values to the right of the histogram without over-exposure. This assumes the dynamic range of the subject is less than the total dynamic range of the camera sensor. Nothing is better than a proper exposure, but when the opportunity is there a slightly brighter exposure will do less harm than underexposure.
It is easy to base your initial judgment on the camera processed jpg, but this is more than a little deceiving. The brightness of the camera screen, and the relativity of that brightness to the light you are currently in may make the images appear brighter or darker than you like. But the histogram doesn't change, so it is a more reliable analysis of the values in the image.
Raw Capture
Linear exposure means that the brightest stop of values in a raw capture contain about 50% of the total number of photons captured by the sensor and each subsequent lower stop contains about 50% of the remaining values. Each stop of lesser exposure therefore has half the photons captured and therefore fewer values available to the processor for information. It is better the expand the contrast of an image downward to create darker values as your are pushing more pixel values into an area that would typically have fewer values, so noise potential is suppressed. If the exposure is brightened, the lesser numbers of pixel values are expanded into areas where more values should be. The result can be breaks in the tonal values which appear as noise or banding in the image.
Difficult Subjects
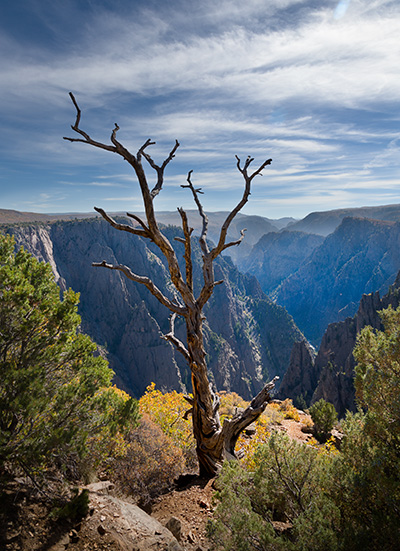
Backlit subjects create an issue as the exposure for the subject is usually different than the overall scene values. This is similar to a portrait situation where the primary subject and the background exposures are different. Using the lightest values in the sky in this case rendered the tree and most of the mountain areas well underexposed. In this case a separate exposure was need for the subject. The subject exposure alone rendered the sky too bright, which is very common. The solution is fairly simple. With two exposures blended together with masking the scene is rendered more like it is seen by the eye. When making exposure choices, properly exposing the primary subject is the better idea even if additional bracketed exposures are need to control the background.
One other option in these cases is HDR processing which is usually done with a software program. The Photomerge | HDR processing in Lightroom does a very nice job of pulling together bracketed exposures in cases where the tonal range exceeds the dynamic range of the camera. For some reason the HDR Pro option in Photoshop doesn't seem to quite do the job as well in my experience. It offers more options and you can play with the details there, but Lightroom simply hands you a pretty well balanced blend of exposures from which you can finesse the details. It is easy today to use the Lightroom HDR blending and often only two exposures are needed for good results. I sometimes find that very contrasty scenes fare better with a third exposure but more than that is not necessary as the middle exposure values in the various exposures overlap one another.
When you analyze certain images you can discover that simply blending exposures with HDR does not get you where you want to be. In the mountains beyond the back lit tree there were tones that I wanted to separate and better define. That is most often simply a matter of curves adjustments and masking. In some images it can also be useful to multiple process the original raw image to take advantage of the most detail possible and then merge those images using masks. Luminosity masking techniques can be valuable in blending images using multiple processed versions of the raw file rather than just curves modifications. The problem there is the process is more complex than most people want to deal with. The bottom line is getting from the original capture to the image you want to create rather than letting the camera or software tricks do the work for you.
Exposure Workflow
First you need to decide which of two primary exposure methods are more appropriate. An overall exposure for most scenes is fine, but there are times when the primary subject exposure and the overall exposure are different. This means deciding whether or not the overall exposure can be managed in post processing as the subject exposure will most likely rule the day. The alternative is multiple exposures, one for the subject and a separate exposure to manage the overall scene values. In portrait photography in ambient light the decision is often whether the background is important enough to require special processing or can be left to simply be dark or light relative to the subject. The alternative is balancing the exposures with added light from reflectors or flash.
For landscapes my process is rather simple. I use either a spot meter or the spot meter in the camera to read the area of the image that is the brightest. When choosing the brightest area you need to ignore specular highlights which are light sources or reflections of light sources. Those will clip in any case and cannot be considered in determining exposure. In the image above with the tree the white clouds at the top right would be the target. The reading would render that point as middle gray so exposure compensation must be made to properly render the brightness values. My goal is to expose the important bright value high enough to properly represent the tone in the original scene without over exposing/blowing out the highlights. That compensation will vary slightly from camera to camera but an increase in exposure of a minimum of two stops will be needed. Testing can let you determine how much compensation you can use without over exposure. Testing will also allow you to compare the actual useful high range against the clipping warnings provided by the jpg preview.
To use the highlight warning in the camera preview, if anything other than specular highlights are flashing you are over exposing. Reduce exposure until only speculars flash, or in the absence of speculars, until the flashing just barely disappears. The histogram will reflect an exposure tending to the right, which is what is desired. In either case, all other values in the image will be rendered relative to this highlight exposure setting. So long as shadows do not hit the left wall the capture is within the dynamic range of the sensor. If the left side is short of the wall that is not a problem. Processing darker values down suppresses noise and does not sacrifice shadow detail. Increasing exposure in processing is what creates noise and loss of detail is from insufficient information in the capture from underexposure. If you want more low end detail you can simply make a second exposure at a higher value and marry that into the original with blending of exposures.
If the overall range of tonal values in the image is not excessive you should have a usable exposure. The tree photo above proves that is not always true. A "proper" exposure for any primary subject would always be a good idea, so we return to the concept that in some cases more than one exposure may be needed. In any image where the primary subject sits in shadow care should be taken to check the exposure of the subject realtive to the overall exposure. A bright subject against a predominantly dark background could create a similar issue. You need to consider the subject and the overall exposure as two possibly different values.
Whites, Blacks and Neutrals
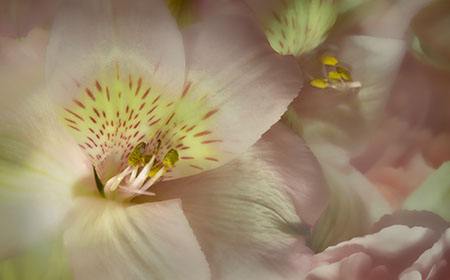
Many images may not have bright areas that are intended to be nearly white, or areas that might be totally black. Flowers are a prime example. In those cases you should make an exposure decision based on where you want those values to fall. That is a more complicated decision and requires a bit more thinking and understanding of how different brightness values are represented in the file. Without getting overly complicated about it, let me suggest that you learn to view images with regard to brightness values as they would be represented in a finished print.
In the flower image the main area in the center is about a full stop brighter than the middle gray exposure your camera would naturally create. Remember that your camera meter tries to render tones to middle gray, which is darker than you might think relative to this flower. A one stop compensation to a brighter exposure would be better. After all these years I still carry a small gray card with me for those times when my brain needs a little help. Reading the card should give you a reasonably accurate exposure. An incident reading with a handheld meter would be another option if you have one.
First you need to determine the accuracy of the meter to middle gray values as that is what meters do. Then you need to test your camera to see what the threshold is for clipping highlights. Those values will be different for jpgs than for raw, so I suggest testing in 1/3 stop increments above two stops over a middle gray exposure to accurately determine the dynamic range of the sensor as it relates to highlights. You should judge those results in Lightroom or ACR in an unprocessed raw file. Finding the point where highlights clip is easy. Finding the point where dark values clip is slightly harder. Determining the detail threshold is even more complicated. Part of the problem is that different cameras with different dynamic ranges and the ability in processing to massage the information in the middle values makes decisions a moving target. Testing and experience rule the day.
If you are hearing this stuff for the first time it is easy to think that it is complex and beyond your capabilities. It is obviously not as you can already make pretty good exposures most of the time. It is simply not familiar. Heck, your camera was not familiar the day you bought it, but you somehow managed to get it to work. Imagine investing a small amount of time over a weekend playing with the testing I am recommending and coming away with the ability to better (properly) expose your files, and to do so easily. At the very least I would bet you gain a better understanding of the histogram. The flexibility of the post processing in a raw file means that good capture takes as much advantage of the linear nature of digital capture as possible. Then you can map colors and brightness values to get the image you want.