Blend Modes I - Luminosity and Color
By changing the mode of the layers to either Luminosity or Color we can restrict the corrections to where we want them to be. That allows us to make color corrections to an image without changing the density of a particular area, or modify brightness or contrast without influencing the color.
Luminosity Mode
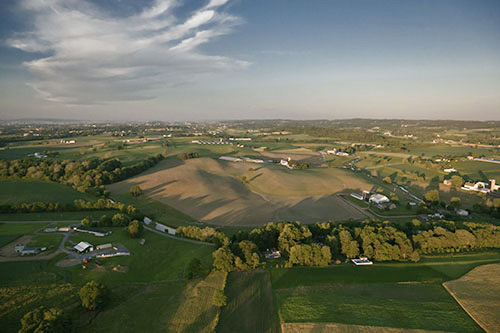
In the image at right changes were made to the sky using Levels. Normally you can simply darken the image in Normal mode with no problem. Using individual channels gives you more control over these changes, but modifications to individual channels also changes the color of the image. Putting a Levels layer in Luminosity mode allows changes to individual channels to modify the sky densities without the color shift. Mouse over the image to see the effect of the Levels changes in only the blue channel in the Normal mode. Modifications to the blue channel shifted the colors toward yellow in the Normal mode, but with the Levels layer in Luminosity mode only the density of the blues changed.
A density change in anything but neutral tones will always primarily modify the predominant color of that area compared to the others and introduce a color shift. This is usually ignored by most Photoshop users as it is minor in most cases. Minor or not, color shifts are usually a bad thing and fortunately are easy to avoid. Using individual channels while in Luminosity mode gives you the kind of control over the density of colors in the image that you had with filters in black and white film. Elements users can use the technique in Levels and Hue and Saturation adjustment layers to modify color densities. Photoshop users can add Curves, Black and White, and Selective Color adjustment layers to their tool chest. Other adjustment layers may also make minor modifications but may be less effective. The bottom line is that changes to an image that primarily need to influence brightness and contrast are best accomplished in Luminosity mode to avoid unwanted changes in color.
A Black and White adjustment layer in Photoshop in Luminosity mode allows you to remap (modify) the densities of the colors in the image rather than convert the image into Black and White. The Black and White adjustment layer sliders have no affect in Color mode as there is no color to modify; the image is simply converted to B&W.
Color Mode

In this image a Hue and Saturation layer in color mode was used to shift the reds in the original to blue. The skin tones and hair were masked to avoid shifts there. If you mouse over the image you can see the changes with the layer in normal mode. In addition to the blues being significantly brighter the shift also affected the blacks in the glove as the brightness values were also lightened. In color mode it was not necessary to mask the glove as luminosity is not changed in color mode. In portraits the color mode can be useful in shifting or intensifying eye or hair color without unwanted changes to density. If the desired color maps individual channels to lower values than the original the result will be a darker tone in addition to the color change. Similarly, higher values can result in brighter tones as seen in the blues. Color mode allows you to control the color without the influence to luminosity. A color overlay or a colored gradient map in color mode will apply the color without shifts in density.
The explanation for the ability to control luminosity separately from color is that Photoshop works in the L*a*b mode in the background. The L channel is luminosity, and the *a and *b channels are the green/magenta (tint) and yellow/blue (temperature) color channels respectively. While that is interesting to know, in almost all cases you will be working in RGB and not L*a*b. Using Blend Modes you can make Photoshop ignore the color or luminosity as needed to effect the image without resorting to using the less comfortable L*a*b mode. Technically speaking there is a difference between using the blend modes and actually working in L*a*b, but unless you have a reason to do so blend modes are a more practical solution.